This is the realm of elevated tile repair: intelligent, detail‑driven solutions that treat each surface as a composition rather than a construction detail. Below are five exclusive insights that sophisticated homeowners and design‑minded renovators can use to ensure every repair feels like a continuation of the original craft, not an obvious correction.
Reading the Surface: Diagnose Before You Touch a Tile
Exceptional repair begins long before a chisel or multi‑tool meets the surface. A refined approach starts with reading the tile assembly as a system—tile, grout, underlayment, adhesive, and even environmental conditions.
Observe how the damage behaves: a single cracked tile in the middle of a field often suggests substrate movement or impact, while a series of hairline fractures along a line may indicate structural deflection or inadequate expansion joints. Listen as well: tapping around the damaged area with a wooden dowel can reveal hollow sounds that betray poor adhesion or voids beneath the tile.
Temperature and moisture history matter too. A crack radiating from a door threshold or large window may point to thermal expansion issues, while damage near showers or kitchens can hint at moisture intrusion. The sophisticated homeowner doesn’t simply replace what’s broken; they insist on understanding why it failed, so that any intervention addresses the root cause—not just the symptom.
Seamless Color Matching: When “Close Enough” Is Not Acceptable
For truly invisible repairs, color and finish matching is a disciplined art, not a casual guess. Tile repair that looks “nearly right” in afternoon light may appear conspicuously wrong by evening or under warm accent lighting. The goal is continuity, not approximation.
Start with the tile itself. If you have attic or basement stock from the original installation, set one beside the damaged area in the actual room lighting to verify that aging, wear, or patina have subtly shifted the tone. Even nominally identical tiles can evolve over time through micro‑abrasion, cleaning habits, and UV exposure. A skilled repair professional may judiciously “age” a new replacement—through careful honing, subtle edge softening, or controlled polishing—to blend with the surrounding field.
Grout is even more exacting. Always evaluate grout color once cured and dry, not immediately after mixing when it appears darker and more saturated. High‑end repair work often involves custom‑tinted grout or grout colorants applied with a micro‑brush to unify an existing floor or wall. Under cabinet LEDs, warm pendants, or cooler daylight from windows should all be considered; a grout that matches under one color temperature but not another is not truly matched.
In refined spaces, the standard is simple: the eye should not be drawn to the repair. If you can see the “patch” from normal viewing distance, the color work is not done.
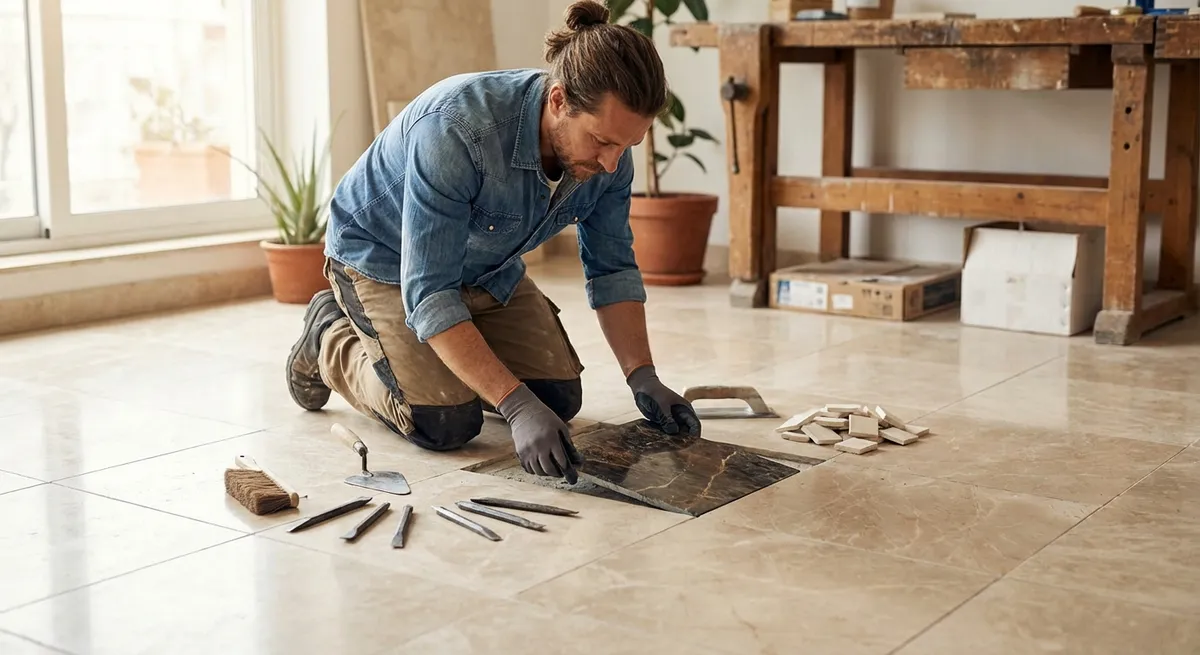
Controlled Tile Removal: Precision Over Force
Removing a single damaged tile without disturbing its neighbors is the moment where craftsmanship most clearly separates premium repair from basic patchwork. Here, technique and restraint matter more than brute strength.
A considered approach begins by cutting through the grout around the damaged tile with a high‑quality oscillating tool and an appropriate blade, easing the tile free from its surrounding bonds. The goal is to isolate the piece so that stress is not transferred to adjacent units. For brittle or large‑format tiles, scoring the surface into smaller sections before prying reduces the risk of transmitting cracks or lifting nearby edges.
Heat may be used very selectively to soften certain mastics or adhesives, but on cementitious thinset, control comes from careful chipping at a low angle and patient removal of old bonding material until the substrate is clean, flat, and stable. Any remaining ridges or voids telegraph directly through to the new tile, resulting in lippage or hollow spots.
This phase should feel almost surgical: dust containment measures, gentle tool use, continuous checking of surrounding tiles, and a mindset that preserving the existing field is just as important as replacing the broken piece.
Elevating Micro‑Repairs: When Full Replacement Is Not Desirable
In curated spaces with rare, discontinued, or artisan tile, full replacement is not always the right answer. Here, distinguished repair focuses on micro‑restoration—techniques that preserve original material while neutralizing visual distraction.
Chipped glaze at an edge can sometimes be resolved by feathering the profile with ultra‑fine abrasives, then rebuilding color and sheen using professional‑grade porcelain or stone repair compounds. For natural stone, minute fissures can be filled with color‑matched epoxy or polyester resins, then leveled and polished to merge with the existing finish. The objective is not to create a glossy “patch,” but to restore a consistent reflection pattern and tactile smoothness.
Hairline cracks that do not indicate structural failure may be stabilized and visually softened rather than removed entirely. In some contexts—especially on aged stone or handmade tiles—a subtle, well‑managed flaw can even contribute to the authentic character of the surface, provided it is structurally sound and comfortable underfoot or to the touch.
A sophisticated repair strategy recognizes that not every imperfection requires aggressive intervention. The standard is not sterile perfection, but harmony: the surface should read as intentional, cohesive, and quietly luxurious.
Future‑Proofing Every Repair: Building in Longevity and Quiet Confidence
A truly premium repair is one you never have to revisit. That requires thinking beyond the immediate visual correction and designing the repair to perform gracefully over time.
This begins with substrate evaluation: confirming that underlayments are appropriate, that deflection is controlled (especially for large‑format tile), and that any moisture‑related issues have been corrected rather than merely concealed. Where necessary, adding movement joints at transitions, perimeters, or long runs can prevent renewed cracking—particularly in spaces with strong sun exposure or radiant heating.
Material selection should be equally exacting. High‑performance mortars, grouts with enhanced stain resistance, and sealers suited to the specific tile and use case all contribute to a repair that ages at the same rate as the original installation. In wet zones, ensuring that waterproofing membranes are continuous and properly integrated beneath the repair is non‑negotiable; aesthetic success is hollow if water begins to compromise the assembly.
Finally, document the repair: product types, color codes, batch numbers, and any custom tint formulas. This quiet act of record‑keeping turns a single successful repair into an insurable future—giving you and any future tradespeople a precise blueprint should the surface ever need attention again.
Conclusion
Tile repair at the highest level is less about “fixing a problem” and more about stewarding a surface back to its intended elegance. It requires patience, discernment, and a respect for both structure and aesthetics. By insisting on accurate diagnosis, uncompromising color and finish matching, meticulous removal and replacement techniques, intelligent micro‑repairs, and forward‑looking durability, homeowners can ensure that even necessary interventions remain invisible to all but the most trained eye.
In the most refined homes, the mark of excellent tile repair is its absence: the quiet confidence of a surface that appears untouched, yet has been thoughtfully, expertly restored.
Sources
- [The Tile Council of North America (TCNA) – Handbook & Technical Resources](https://www.tcnatile.com/technical.html) – Authoritative standards and best practices for tile installation and repair
- [ANSI A108/A118/A136.1 Installation Standards (via TCNA)](https://www.tcnatile.com/faqs/72-ansi-standards.html) – Industry installation and materials standards that inform high‑quality repair methods
- [Schluter Systems – Substrate Preparation and Movement Joint Guidance](https://www.schluter.com/schluter-us/en_US/faq) – Technical details on substrate stability, movement accommodation, and waterproofing relevant to lasting repairs
- [Custom Building Products – Grout & Colorant Technical Information](https://www.custombuildingproducts.com/how-to/product-usage/grout.aspx) – Practical insight into grout selection, color matching, and maintenance
- [U.S. General Services Administration – Historic Tile and Terrazzo Preservation](https://www.gsa.gov/technical-procedures/maintain-and-repair-interior-stone-and-tile) – Guidance on sensitive repair strategies for historic and high‑value tile surfaces